 Save
Save Last Easter, I was scrolling through Dubai-inspired dessert videos at midnight when I stumbled upon chocolate eggs filled with the most audacious combination of textures—crispy, nutty, utterly indulgent. Something about the way they caught the light made me determined to recreate them in my own kitchen. What started as curiosity became an obsession, and now these strawberry-chocolate eggs are the thing people ask me to make every spring.
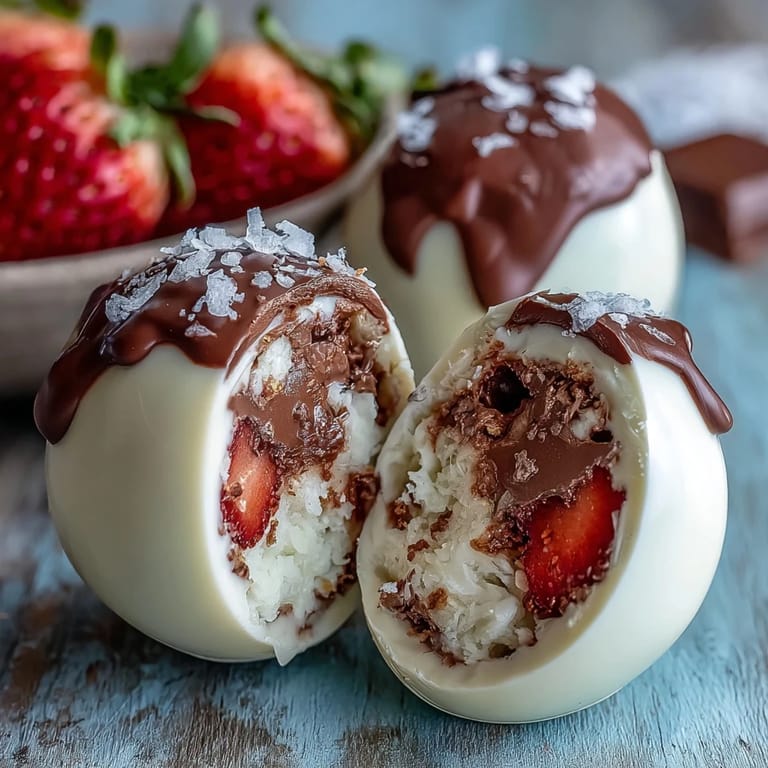
I made these for my sister's book club last year, and the room went completely silent when people tasted them—not because something was wrong, but because they were too busy experiencing pure joy. One guest actually asked if I'd made them that morning (I hadn't), and I realized right then that homemade chocolate eggs hit differently than store-bought ones. The pink-white marbling on the shell, the slight shimmer of gold leaf catching the light—people remember these.
Ingredients
- High-quality white chocolate (300 g): This is where you don't skimp—cheap chocolate tastes waxy and won't have that silky snap when you bite into it, so hunt down something with real cocoa butter.
- Freeze-dried strawberry powder: The secret weapon that gives these eggs their delicate pink hue and subtle berry flavor without added moisture that would ruin your shell.
- Red or pink food coloring: Optional, but a tiny drop deepens the color beautifully if your strawberry powder is pale.
- Milk chocolate (80 g): Choose a decent quality here too—it's the base of your filling and deserves respect.
- Hazelnut spread (70 g): This is your creamy anchor, binding everything together while adding that luxurious richness.
- Crisped rice cereal (40 g): What makes people go "wait, what IS that texture?" when they bite in—don't skip it.
- Roasted hazelnuts (30 g chopped): The nod to Middle Eastern-inspired flavors, and they add depth that plain nuts won't give you.
- Vanilla extract (1/2 tsp): A whisper of warmth that ties the filling together without screaming vanilla.
- Edible gold leaf: Pure theater, honestly, but your eggs will look like they belong in a luxury Dubai boutique.
Tired of Takeout? 🥡
Get 10 meals you can make faster than delivery arrives. Seriously.
One email. No spam. Unsubscribe anytime.
Instructions
- Melt the white chocolate gently:
- Use a double boiler if you have patience, or microwave in 20-second bursts if you're like me and tend to rush. Either way, stir between each step until it's completely smooth and glossy.
- Tint your chocolate pink:
- Stir in the strawberry powder first—it dissolves more evenly than food coloring alone—then add just a drop of color if you want it deeper. Mix thoroughly so there are no streaks.
- Coat the egg molds:
- Using a pastry brush or the back of a spoon, paint a thick, even layer into each silicone mold, making sure the bottom and sides are well covered. This is meditative work, so don't rush it.
- Build a sturdy shell:
- Chill for 10 minutes, then apply a second coat for strength—thin shells crack when you're filling them, which I learned the hard way. Refrigerate again until completely set, about 15 minutes.
- Make the filling magic:
- Melt the milk chocolate gently, then stir in hazelnut spread, vanilla, crisped rice, and hazelnuts until it feels like a thick, spreadable dream. Let it cool slightly while you admire your chocolate shells.
- Fill each egg carefully:
- Spoon or pipe the filling into the shells, leaving a small chocolate border around the edges so they'll seal properly. Chill for 10 minutes to set.
- Seal the eggs closed:
- Warm the edge of a chocolate shell half by holding it near steam or a warm bowl, then press it gently onto the filled half. The warmth will help them stick.
- Perfect the seams:
- If there are gaps, drizzle a tiny bit of melted chocolate around the edges and smooth with a warm spatula or knife. It doesn't have to be perfect—slight rustic imperfections look artisanal.
- Add the final flourish:
- Brush with gold leaf for glamour or drizzle with extra white chocolate in artistic swirls. Refrigerate until serving time.
 Save
Save There's something deeply satisfying about gifting someone a box of these eggs and watching their face when they realize it's homemade and not from some fancy chocolatier. That moment when they understand you spent time making something beautiful just for them—that's what these eggs do.
Why Silicone Molds Are Worth the Investment
I used to think silicone egg molds were an unnecessary splurge, but after my plastic mold disaster, I realized they're genuinely essential. They release perfectly without any sticking, they conduct heat evenly for consistent shells, and they make you feel professional in the kitchen. Once you own them, you'll find yourself making chocolate eggs year-round just for the excuse to use them.
Temperature Control and Patience
The difference between gorgeous, snappy chocolate and dull, greasy chocolate comes down to temperature management. Overheating chocolate even slightly makes it seize or bloom, so those microwave bursts really do matter more than you'd think. I learned this when I got impatient and blasted my chocolate for a full minute—ended up grainy and disappointing, but the lesson stuck with me.
Custom Variations and Gift-Giving Ideas
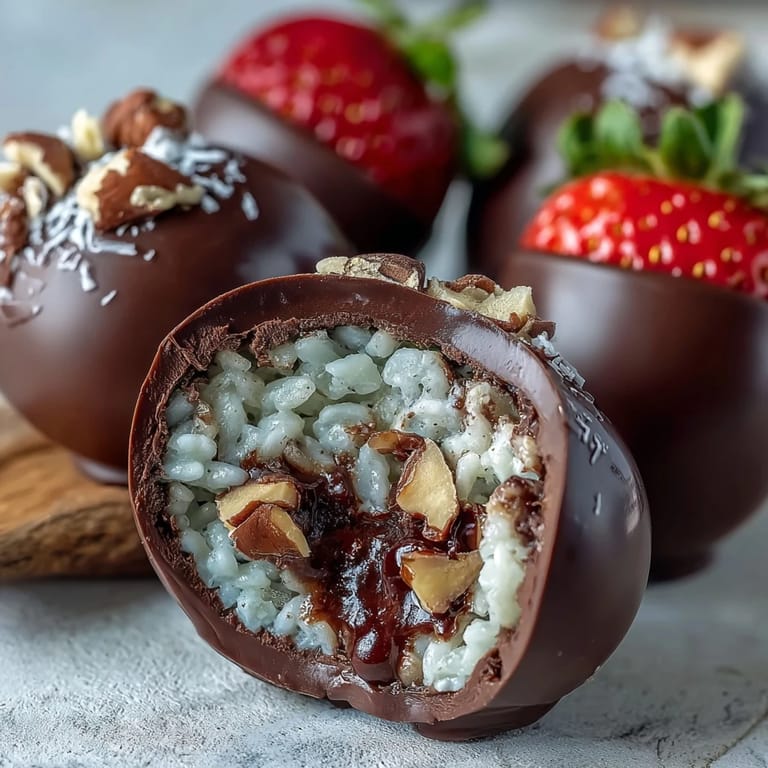
Once you nail the basic technique, these eggs become a canvas for creativity and personal touches. Dark chocolate shells with pistachio filling, ruby chocolate with raspberry powder, or even a coffee-hazelnut combination—the structure stays the same, but the flavors can follow your mood or your guests' preferences. These also freeze beautifully for up to a month, so you can make them ahead and feel smugly prepared.
- Try swapping hazelnut spread for almond butter or tahini for a different flavor profile.
- Make them smaller using mini molds for elegant party favors or stocking stuffers.
- Layer different chocolates in the shell for a marbled effect that catches every light.
 Save
Save Making these eggs transforms Easter from ordinary to unforgettable, and honestly, they're just as good made any time you want to feel a little luxurious. Once you've made them once, you'll understand why they're worth the effort.
Recipe Q&A
- → How do I achieve the vibrant strawberry color in the chocolate shell?
Mix freeze-dried strawberry powder with melted white chocolate and add a few drops of red or pink food coloring for a deeper hue.
- → What alternatives can I use if I have nut allergies?
Omit hazelnuts and replace hazelnut spread with sunflower seed butter to maintain a similar texture and flavor balance.
- → How should I chill the chocolate shells for best results?
Chill the coated molds for about 10 minutes between layers and refrigerate until fully set to create sturdy shells.
- → Can I use different types of chocolate for this dessert?
Yes, you may substitute white chocolate with dark or ruby chocolate for a unique twist in flavor and appearance.
- → What tools are recommended for assembling the chocolate eggs?
Use silicone egg molds, a pastry brush or spoon for coating, and a spatula for mixing the filling.
- → How do I seal the chocolate eggs neatly?
Warm the edge of a chocolate shell half and gently press it onto the filled half, smoothing seams with extra melted chocolate if needed.