 Save
Save The crunch and sizzle of these spring onion pancakes instantly bring to mind the lively waft of anticipation in my kitchen when I first gave them a go. One rainy afternoon, my curiosity was piqued by a neighbor breezily describing her trick for getting those ethereal flaky layers. The scent of scallions hitting hot oil is honestly half the reward, coaxing everyone out of their screens and into the kitchen. There’s satisfaction in feeling the dough soften under your hands as you knead, making this far more immersive than it looks on paper. The real magic, though, happens when you tear into a warm, crisp edge and find layers of delicate, fragrant green inside.
I once made these for an impromptu game night, laughing as a friend tried (and failed) to flip one with chopsticks instead of a spatula. The pancakes vanished within minutes—everyone crowding around the pan, eager to snag the next crispy wedge. It’s the kind of dish you end up eating with your fingers, leaving behind oily, happy fingerprints and lots of chatter. Even the resident skeptic of all things green went back for seconds. Maybe it’s the shared mess or that bite of steamy scallion, but these always get people talking.
Ingredients
- All-purpose flour: I’ve found that regular flour creates just the right chewy base—the kind that turns flaky when layered and fried.
- Boiling water: Using boiling water partially cooks the flour, ensuring a supple, easy-to-work dough.
- Cold water: A splash of cold water brings the dough together without making it sticky.
- Salt: A touch of salt seasons both dough and filling, making every bite pop.
- Spring onions (scallions): The more vibrant and fresh, the better—their sweetness will shine after cooking.
- White pepper (optional): I love the subtle heat and earthiness it adds, but it’s just as tasty without it.
- Vegetable oil: Be generous: oil is the secret to shatteringly crisp layers and golden edges.
Tired of Takeout? 🥡
Get 10 meals you can make faster than delivery arrives. Seriously.
One email. No spam. Unsubscribe anytime.
Instructions
- Mix and Rest the Dough:
- In a large bowl, combine flour and salt and pour over boiling water—listen for that slight hiss—stirring with chopsticks until you see a shaggy mess. Add cold water and knead until the dough is smooth and elastic, about 5 minutes; cover with a damp cloth and let it breathe for 20 minutes.
- Shape into Balls:
- Divide your dough into four equal lumps and roll each one into a neat ball—no need for perfection, just even sizes so they cook at the same pace.
- Roll and Fill:
- Take a ball and roll it into a thin rectangle (about 1/8 inch), then brush a thin layer of oil over the surface. Sprinkle with a pinch of salt and a fourth of your spring onions, scattering them all the way to the edges for maximum flavor.
- Spiral the Dough:
- Roll the rectangle up like a jelly roll, then twist it into a spiral shape and tuck the end underneath. Press down lightly to flatten, then carry on with your other dough pieces.
- Final Roll Out:
- Roll each spiral into a 6-inch round—watch the layers swirl beneath your rolling pin, promising flakiness later.
- Pan Fry:
- Heat a couple tablespoons of oil in a nonstick skillet over medium heat and fry one pancake at a time. Each side needs about 2 to 3 minutes until brilliantly golden and crisp—add more oil if your pan looks dry between pancakes.
- Rest and Serve:
- Place the finished pancakes on a plate lined with paper towels to blot excess oil, then cut into wedges. Serve warm, ideally with a little soy sauce or chili oil for dipping.
 Save
Save  Save
Save The day my little brother insisted on helping—flour everywhere, spring onions bouncing off the counter—was the first time these pancakes became more than just a snack. That batch never looked perfect, but it tasted twice as good for the laughter and mess.
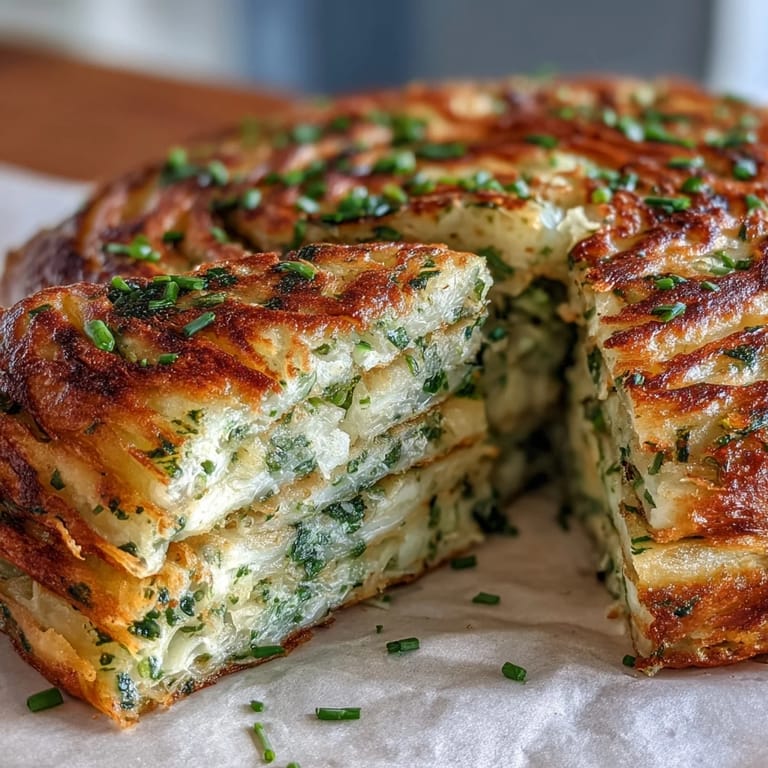
Making Layers Like a Pro
The secret to those irresistible layered bites is fearless oiling—don’t skimp between dough sheets, and use a light touch with your rolling pin so you don’t squash the spirals flat.
Choosing and Cutting Scallions
The best flavor comes from fresh, firm scallions: slice them thin for a gentle flavor throughout or chunkier if you love a big, oniony hit. I also like to save a few prettiest slices for a garnish after frying, which adds color and bite even as these pancakes cool.
Serving and Storing Tips
Spring onion pancakes are at their peak warmth—fresh from the skillet, crispy and aromatic. You can always keep leftovers wrapped in foil and reheat them in a pan to revive their crunch.
- Let them cool before stacking so they don’t steam and soften.
- Chili oil isn’t just for dipping: drizzle some on top for extra zip.
- If making ahead, freeze un-fried pancakes with parchment between layers and fry straight from frozen for weekday ease.
 Save
Save  Save
Save There’s something joyful about breaking bread—especially when it’s hot, flaky, and meant for sharing. These pancakes always invite company and smiles, no matter how simple your table looks today.
Recipe Q&A
- → How do I make the dough tender?
Use a mix of boiling and cold water and knead until smooth. Resting the dough under a damp cloth for about 20 minutes relaxes the gluten and yields a tender, workable dough.
- → What creates the flaky layers?
Rolling the dough thin, brushing each sheet generously with oil, then rolling and coiling the sheet builds laminated layers. Flattening and re-rolling those coils produces the flakiness as they fry.
- → Which part of the scallion is best to use?
Use both the white and green parts for a balance of mild onion flavor and fresh aroma. Slice very thin so the scallions meld into the layers without releasing too much moisture.
- → How do I get the exterior extra crispy?
Heat the skillet to medium, add enough oil to coat the surface, and fry 2–3 minutes per side until deeply golden. Adjust heat so they brown without burning and add oil between batches if needed.
- → Can I make them ahead and reheat?
Yes. Store cooled pancakes in an airtight container in the fridge for up to 48 hours. Re-crisp in a skillet over medium heat or in a hot oven for a few minutes to restore the texture.
- → Any good substitutions for variation?
Add finely chopped garlic, sesame seeds, or a pinch of white pepper to the filling. For a gluten-free attempt, try a dedicated gluten-free flour blend but expect a denser texture and adjust hydration.